A computer spring clean with only a vacuum and a soft brush can improve both the speed and reliability of your computer. The more dust that gathers on the computer’s vents and fans, the hotter it is going to run and inevitably slow down. In the worst-case scenario, your cards, power supply units and motherboards can fail entirely. In this post, we will present some practical tips on what you will need to perform the task and how to go about it.
Gear Up, Power Down
 As with all good DIY projects, lets start with assembling everything that you will need to do the job. You will need a small, soft, clean (preferably new) paintbrush, a can of compressed air, a vacuum and some cloths for cleaning the casing and cabling.
IMPORTANT! Switch off your computer and make sure to unplug it from the wall. Carefully unplug all cables including all of your accessories and input devices (e.g. mouse, keyboard, speakers) and set the cables to one side for cleaning later.
To prevent backache, it is recommended to perform this task on a desktop or countertop – cleaning it on the floor will be uncomfortable and a bit of a bind!
OK. You’re ready to get cracking.
First Things First
Starting with the outer casing, use your vacuum to remove dust from sockets, vents and USB ports, video and networking ports. Dust will always find a way into unused ports so ensure these get some attention also.
When vacuuming has been completed, wipe down the outer casing. You will be OK to use a damp cloth or a household surface cleaner if there are any particularly stubborn marks or sticky messes – do take great care not to get any water in any open ports or vents
Inside and Out
You may be flabbergasted at the level of dust that collects inside a computer case. So, if you’re happy with some minor technical aspects of computer maintenance, you can take off the outer casing. You can remove the side panel from most computers nowadays using a catch – older machines you may have to remove a few screws first. Your aim is to get inside the case so you can see the damage caused by months (or years?) of dirt.
Once inside, we recommend an initial vacuuming of the accessible interior. You should use the soft brush tool on your vacuum if available. Be careful near fans and avoid displacing any components with the nozzle.

Wipe down the bare areas of the case with a clean, dry cloth
When you’ve completed the vacuuming, it’s time to get the paintbrush and your compressed air. Starting from the top of the case, use the brush to gently remove any dust from the motherboard and board slots. Your compressed air can help to dislodge more stubborn dirt or dust – do make sure you only use short bursts with a sweep of the paintbrush to follow, removing the dust from the case. Short sprays are vital because long bursts will introduce moisture into your system, possibly causing a short circuit.
Now wipe down the bare areas of the case with a clean, dry cloth, being careful to avoid electrical parts. Always use the brush for this – you risk leaving behind conductive material otherwise.WOnce completed, replace the computer cover and any retaining screws where necessary.
Cable Cleaning

Wipe each cable with a damp cloth or disinfectant wipe
You can now move onto your cables. Having already unplugged them from both ends, use a slightly dampened cloth or a disinfecting cleaning wipe to clean them. Simply wrap the cable in the cloth or wipe and then starting from one end, pull the cable through your cloth to the other end. Finish off by wiping the plug and connectors on each end and your done.
Repeat with all cables – using a clean part of the same cloth or wipe each time. Remember to include the cables that are attached to some of your peripherals or input devices.
Keyboard and Mouse
Research has indicated that computer keyboards have more bacteria on them than a toilet seat! Given that worrying nugget of information, you might want to consider cleaning and disinfecting your keyboard – especially if you share your computer.
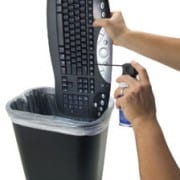
First, flip your keyboard upside down over a bin (or the desk or countertop) and give it a few gentle taps. Add some short bursts of compressed air into it to remove crumbs, dust, and other ‘stuff’ from between the keys.
Now wipe the keys, surround and palm rest with a lightly dampened lint-free cloth, like a microfiber cloth or another disinfecting cleaning wipe. Using a dry microfiber cloth, remove any remaining moisture from your keyboard.

Wipe the exterior of your mouse with disinfectant wipes, making sure that you squeeze out any excess liquid before wiping the mouse. Take care to avoid getting moisture into any openings. Immediately wipe the mouse with a lightly dampened microfiber cloth and finally with a dry microfiber cloth, remove any remaining moisture from your mouse.
Finally, connect the keyboard, mouse, monitor and power cable, with no other peripherals attached. Then switch on the machine to test that it’s still working. If all has gone well, you should be able to enjoy a quieter, cooler and cleaner PC. Re-attach your remaining peripherals and devices and the job is done.